Publish Your Chatbot
Test Your Experience
Before you go live with your chatbot, make sure you test the experience and of course, share it with your colleagues. Choose out of following three options to securely test your chatbot and retrieve feedback from colleagues.

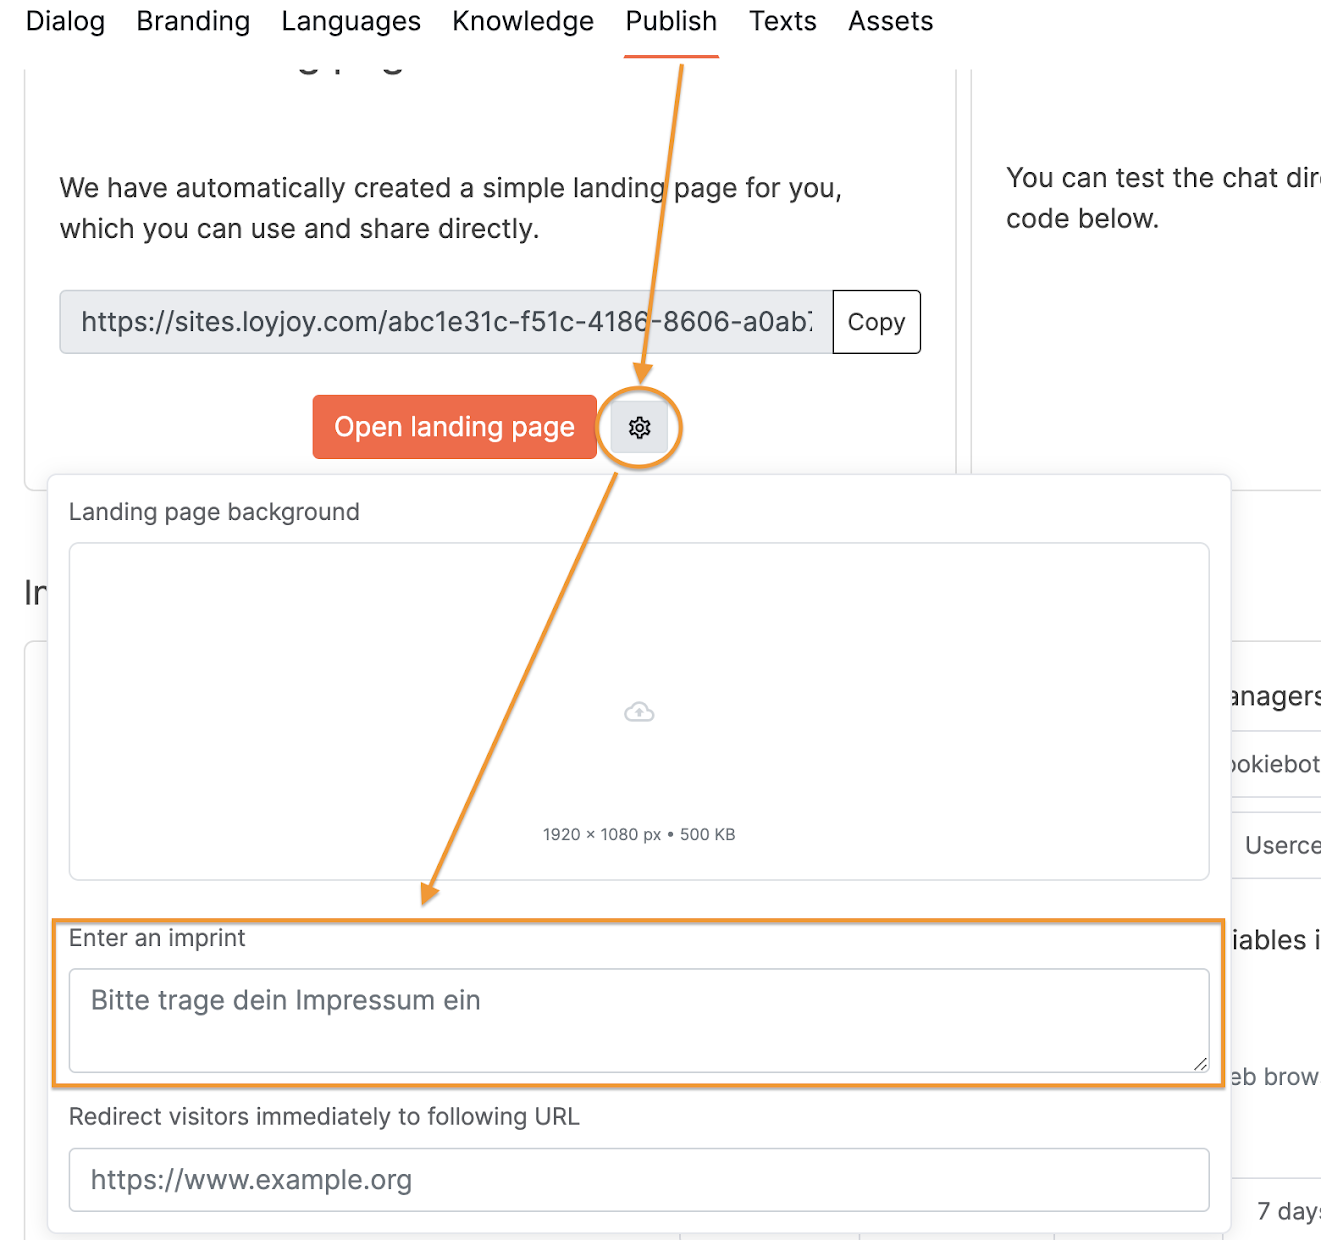
- View your chatbot on a built-in LoyJoy landing page. We have automatically created a simple landing page for you, which you can use and share directly. This is especially handy for publishing to social media. Click on the gearwheel to adjust the landing page to your brand with a background image and an imprint. You can also forward visitors of the landing page to a custom URL of your choice.

- To test the experience for mobile users you can review the chatbot on your smartphone. Just scan the QR code with your smartphone camera.
- Lastly, explore how your chatbot will look like on your website by typing in your website URL. Disclaimer: Display problems may occur in the preview. These do not occur if you embed LoyJoy on your website 😇
Integrate the Chat into Your Website
To integrate the chat into your website, simply copy the code snippet into your website HTML. The code snippet is on the Publish tab of your experience. Each snippet has a unique ID. If you have a consent manager (cookie banner) on your website, in the HTML put the LoyJoy code snippet behind the code snippet of your consent manager so that LoyJoy can check the consent status while loading.
LoyJoy Chat does not affect the load time of the web page. The LoyJoy script is executed only after the page is loaded. This is technically achieved by including the async and defer attributes, which prevent render-blocking behavior as checked by Google Chrome Lighthouse.
Here is a sample LoyJoy snippet to test the integration. Copy it to try the LoyJoy integration on your website.
<script async defer src="https://stable.loyjoy.com/widget.js?process=8dfa239f-eda1-40df-aec6-e7c6169a4233"></script>
There are many settings that can be set for the chatbot behavior before publishing. The snippet will change based on the settings.

Additionally, you can open, close, hide and show the chat by adding a button that calls our JavaScript API.

Create your own Website that hosts your chat
If you want to create your own website on which the chat is embedded, please read our guide on [/guides/publish/](how to create your own website with your own domain and how to embed the chatbot on it).
Integrate with your Consent Manager
If you have a consent manager (aka cookie banner) on your website, the LoyJoy chatbot can act upon the customer's selection in the cookie banner. To connect LoyJoy with your consent manager, select it in the settings. We currently support Borlabs Cookie, CCM19, Cookiebot, ConsentManager, CookieFirst, OneTrust, Sourcepoint, Tealium, Usercentrics, Atruvia, and OneConsent. If your consent manager is not supported yet, send an email to support@loyjoy.com and we will add the missing consent manager to LoyJoy for free.
In the consent manager settings, you can choose between Basic and Smart.
- With
Basic, the LoyJoy code snippet will be adapted with parameters so that it conforms to your consent manager. Typically these parameters are the cookie category and that the widget should load after the consent manager has been closed. The disadvantage of theBasicmode is that (1) when LoyJoy is classified as an essential cookie, the LoyJoy chat will be loaded instantly, potentially colliding with the consent manager window and (2) when LoyJoy is classified as marketing cookie, the chat will not be loaded if the customer rejects such cookies. - With
Smartthese disadvantages are mitigated. LoyJoy will (1) listen for the consent manager window to complete to show the chat afterwards and (2) will show the chat in any case, however with cookies disabled if the customer rejected any cookies. There is no need to classify LoyJoy as essential, functional or marketing, as the chat will only enable cookies if all categories are consented. So generally LoyJoy recommends using theSmartmode.
In conclusion we strongly recommend to use the Smart mode, and if your specific consent manager is missing in LoyJoy, to let us know.
Chat History and Variables
You can choose whether you want the chat to store the chat history and variables. When activated, the chat history and variables will be stored locally in the customer web browser in the local storage object loyjoy-chat. This storage stays on the customer devices and thus is only accessible to LoyJoy, when the customer interacts with the chat.
When the chat history is activated, customers revisiting the website will be able to see past messages. If the chat history is not activated, a new chat flow will be started each time a user visits the website.
Tracking Tool
You can integrate a tracking tool (e.g Google Analytics see here). The tracking tool will be triggered when events occur in the chat.
Web Push
In case that the experience contains a Web Push Opt-In process module, further explanations are given how to enable this capability for your website.
Social Media and native Apps
Choose one of the various Social Media and app platforms we support to provide your Experience on different platforms for your clients.
Instagram Story
To post your chatbot directly into an Instagram Story, simply copy and paste the URL into the Swipe-Up link.
Facebook Story
To post your chatbot directly into a Facebook Story, simply copy and paste the URL into the Swipe-Up link.
TikTok Ads
To post your chatbot directly into a TikTok Ad, simply copy and paste the URL into the ad.
iOS
To use your chatbot directly into a native iOS app, simply copy and paste the URL into a WKWebView.
Android
To use your chatbot directly into a native Android app, simply copy and paste the URL into a WebView.
Insert Imprint
When publishing your chatbot via the LoyJoy landing page, it is mandatory in some regions to include an imprint to meet legal requirements. The imprint can be accessed in different ways, such as through emails, on the landing page, or directly within the chat interface. Here you can see how to set it up: