Variables
Do you want to collect data from customers? Do you want to specify that BPMN process modules will be entered only when certain messages have been chosen in a questionnaire? You can do that with variables!
To achieve this, you can store data entered by customers in BPMN process variables. Process variables can be created by most process modules and are either created by process modules automatically or as specified by you in the process module configuration.
Examples
In the following examples we collect data with the process modules questionnaire and variable. We are going to start with the questionnaire.
Variable from Questionnaire Module
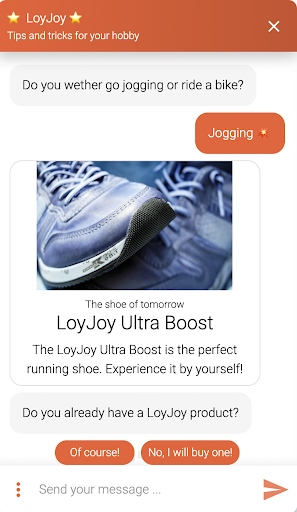
Let´s work with the following example: During the chat, the consumer will be asked whether he likes jogging or riding a bicycle. A message should then be sent with tips for suitable clothing for the chosen hobby. If you would only drag and drop the modules, all of them would be sent. Instead, use variables to only have the right message sent. With variables, you can set what happens if the consumer clicks on one of those hobby messages.
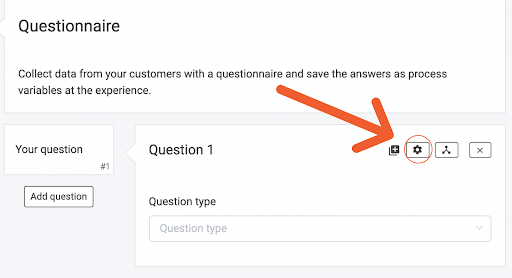
To do so, first, click on the settings icon.
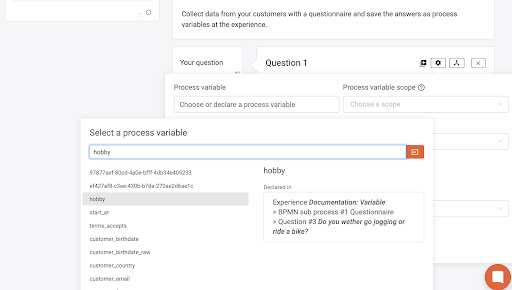
Afterward, choose a process variable. A meaningful name is suitable here. Our example is about hobbies. That is why the name "hobby" is appropriate.
Then you click on the settings icons for both answer options too.
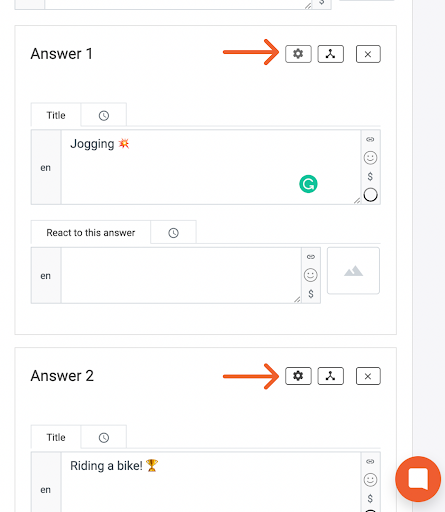
Here we set a fixed value and not a process variable. Because of transparency, we choose “jogging” and “bicycle”.
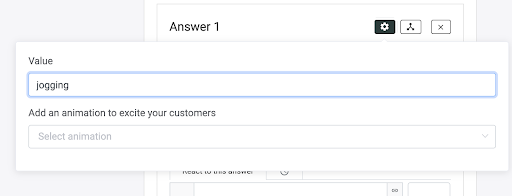
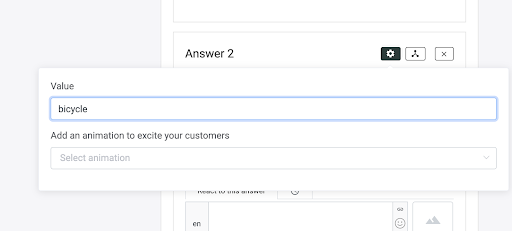
Those names can be selected freely.
Variable from Variable Module
At the beginning of this article, we mentioned that variables can be set with two modules. Now you know how it works with the questionnaire. Next, you learn how to use the module “variable”. It is not that different from the questionnaire. For example, there are different combinations in which the consumer will be asked if he wants to sign up for the newsletter. So that he is not annoyed, we add a variable to save the answer. Therefore you need a variable.
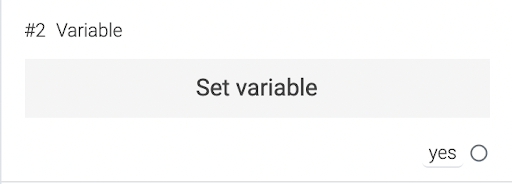
In case you have a decision jump that is asking for signing up, there are the options “yes” and “no”. Both will jump to a module “variable” (two different).
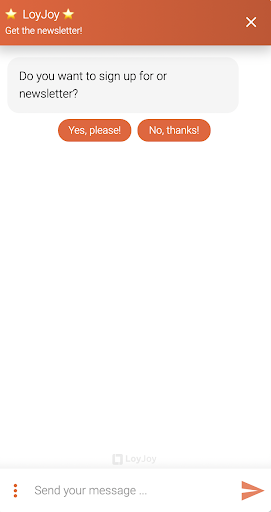
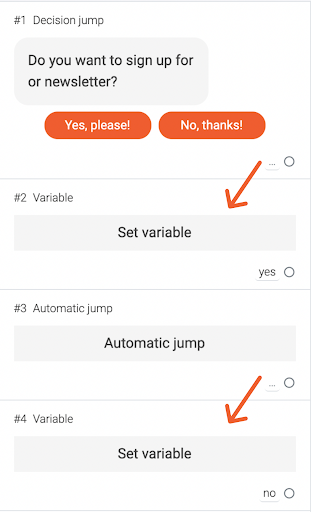
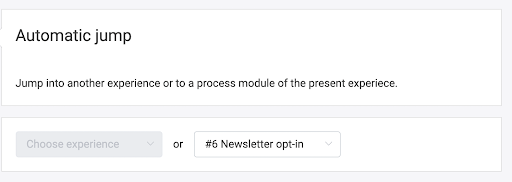
The first module is for “yes” and the second one for “no”. We need an automatic jump because else the second module “variable” will be sent too and the chatbot will save both variables. The brick jumps to the newsletter sign up.
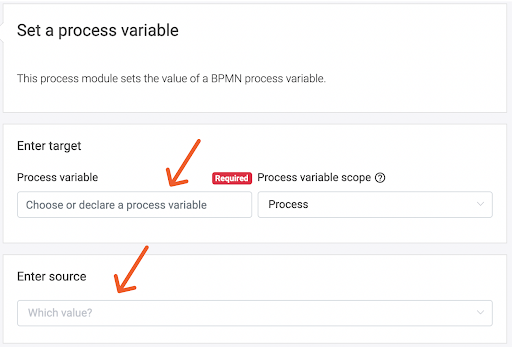
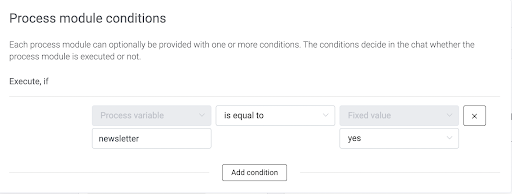
Then you fill in the fields. It is similar to the questionnaire. We need a process variable and a fixed value. Under the first arrow, you fill in a name for the process variable (for example newsletter). Under the second arrow, you choose a fixed value and add a name. It is advisable to use “newsletter” as the process variable and “yes” (or “no” for the other module).
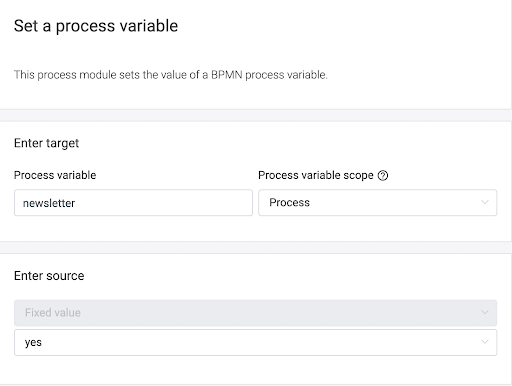
Afterwards, condition every newsletter module and question, if the consumer wants to sign up, with the variable you set in when the consumer says “yes”.
You can use variables in many different cases. We made up a few examples to show you how it works!
Variable in Conditions
Now we have chosen our variables. As a next step, you choose modules that will be sent after the consumer's decision. The following step works with every module, we are using the module product overview. At each module, there is a small circle in the right corner.
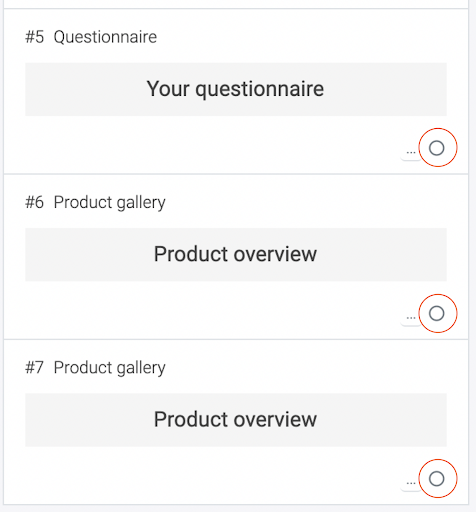
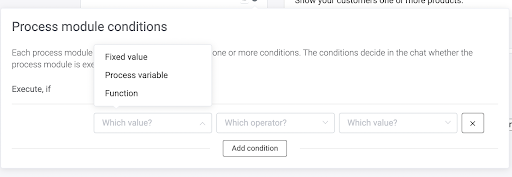
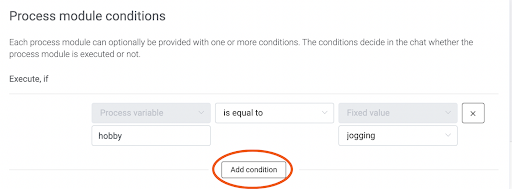
Click on it. Afterward, choose “add condition” and fill in the three fields. For this, you need to remember the given names in the questionnaire.

For the first field choose “process variable”. Fill in the given name for the question. In our example, it was a “hobby”.
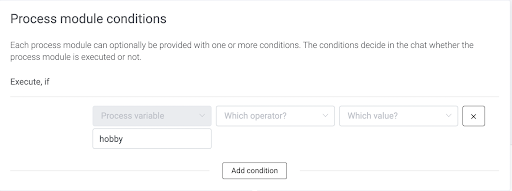
When setting a variable it is important to pay attention to spelling. The best is, to capitalize or lowercase all initial letters. Also, avoid the space behind your variables. As soon as there is a little difference, the chatbot doesn't recognise the variables as equal. So take your time and double-check, because this can save you a lot of time later! Next, an operator must be chosen. In our case we use “is equal”.
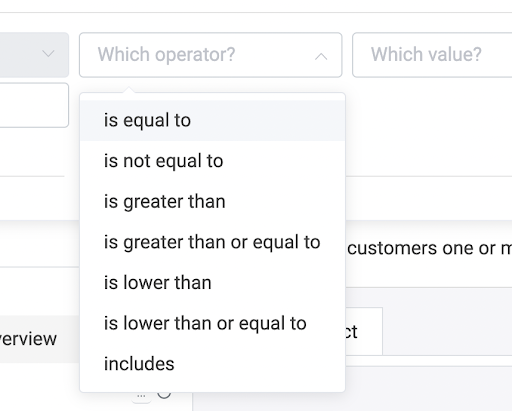
For the last field, you have to select “fixed value”.
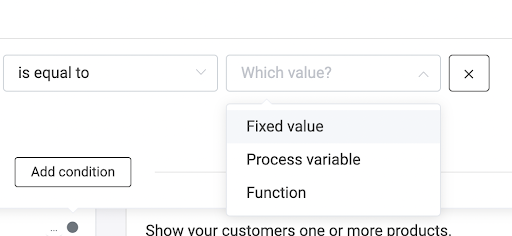
In this field, enter what was previously entered for one of the answer choices. If this module has a message for consumers who have chosen “riding bicycle” you enter in the last field “bicycle” and the other way round. The same thing you do for the second module.


If you have more than two answer options you can add more modules as well. Besides, it is possible to condition more than one module for the same answer. For example, you want to give an interview and tips for the best practice to your consumer, and afterward, he can subscribe to a matching newsletter. Just drag and drop all those modules in a row and condition them with the same variable.
Besides that, one individual module can have more than one condition for when it is played. To do this, you add another condition.
Here you can choose whether both conditions must be fulfilled (and) or only one of the two (or).
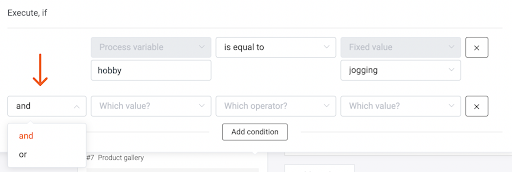
For example, if there were another answer option where the jogging tips should also be played, you would choose "or".
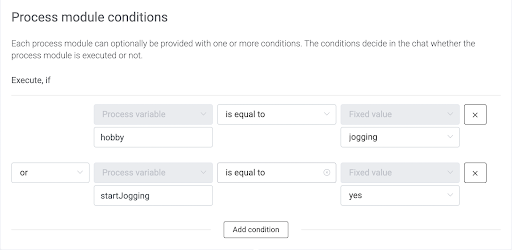
If we add a second question instead, where the user has to click on a certain answer for the module to be played, “and” would be suitable. For example, after the consumer has selected "riding a bicycle", he is also asked whether he wants to ride an ergometer or ride in the fresh air. For the rider in the fresh air, there is a product recommendation for sunscreen, and for the rider at home, a recommendation for different series to watch on the bike. Here, too, any number of conditions can be added.
As soon as more than one condition is necessary, however, you should consider whether a decision table is easier to handle. For more information, please read our article.
Process-Independent Variables
Many LoyJoy process modules automatically create process-independent variables, when customers interact with the chat. For example such process-independent variables can be the first name a customer has entered in the chat. Process-independent means, that the variable is available in the current process, and all other processes. This makes sense for variables regarding the customer, e.g. for the first name or postal address.
The following list covers most process-independent variables, which are created by process modules. Please note that:
- The variable names do not form a forever constant API, as they may be extended and changed with the further development and growing feature set of LoyJoy. So you can use these variables, however they belong to their corresponding process module and might change occasionally, if the process module is further developed.
- Additional variable names may and certainly will be created that are not included in this list, as many process modules such as the Variable process module and Questionnaire process module can create arbitrary variables as decided by the modeller.
| Variable name | Variable description |
|---|---|
| auth_email | The customer email address, verified in an authentication step. (Sign-In, Auth0, ReachFive, ProCampaign, Beiersdorf) |
| birthdate | The customer birthdate. (Birthdate) |
| consent_double_opt_in_newsletter | true if a newsletter double opt-in has been given. (Newsletter Opt-In) |
| consent_double_opt_in_profiling | true if a profiling double opt-in has been given. (Profiling Opt-In) |
| consent_double_opt_in_reminder | true if a reminder double opt-in has been given. (Reminder Opt-In) |
| consent_double_opt_in_sms | true if a SMS double opt-in has been given via TAN code. (SMS Opt-In) |
| consent_single_opt_in_newsletter | true if a newsletter single opt-in has been given. (Newsletter Opt-In) |
| consent_single_opt_in_profiling | true if a profiling single opt-in has been given. (Profiling Opt-In) |
| consent_single_opt_in_reminder | true if a reminder single opt-in has been given. (Reminder Opt-In) |
| consent_single_opt_in_sms | true if a SMS single opt-in has been given. (SMS Opt-In) |
| consent_single_opt_in_web_push | true if a Web push single opt-in has been given. (Web Push Opt-In) |
| country | The customer country. (Postal Address) |
| The customer email, not verified in an authentication step. (Email) | |
| firstname | The customer first name. (First Name, Postal Address) |
| house_number | The customer house number. (Postal Address) |
| gender | The customer gender. Values can be male, female or diverse. These values are not exhaustive as additional values might occur depending on the process configuration. (Gender) |
| language_iso_6391 | The customer ISO 6391 language code. |
| lastname | The customer last name. (Last Name, Postal Address) |
| locality | The customer locality, e.g. city. (Postal Address) |
| loyalty_balance | The customer loyalty balance, if the customer has received loyalty points. (Code, Coupon Code, Loyalty, Loyalty Referral, Redemptions, Rewards, Win) |
| participation_num | The number of participations a customer has made in all processes. (Participation) |
| phone | The customer phone numer. Can be any format, however should be according to E.164. (Phone) |
| region_iso_31662 | The customer region according to ISO 31662. |
| salutation | The customer salutation or honorific prefix, e.g. Mr. or Ms.. (Postal Address) |
| sign_up_ip_address | The customer sign-up IP address. (Sign-In) |
| sign_up_referrer | The customer sign-up referrer. (Sign-In) |
| sign_up_timestamp | The customer sign-up timestamp. (Sign-In) |
| sign_up_user_agent | The customer sign-up user agent, i.e. web browser. (Sign-In) |
| street | The customer street address, optionally including the house number. (Postal Address) |
| tags | An array of tags that has been assigned to the customer. (Tag) |
| zipcode | The customer zip code. (Postal Address) |
Process-Specific Variables
Many LoyJoy process modules automatically create process-specific variables, when customers interact with the chat. For example such variables can be a coupon code a customer has received in the chat. Process-specific means, that the variable is only available in the current process, i.e. scoped to the current process. So the variable will not be visible in other processes. This makes sense for variables that are only relevant to the current process such as a coupon code received, but not the first name of the customer.
The following list covers most process-specific variables, which are created by process modules. Please note that:
- The variable names do not form a forever constant API, as they may be extended and changed with the further development and growing feature set of LoyJoy. So you can use these variables, however they belong to their corresponding process module and might change occasionally, if the process module is further developed.
- Additional variable names may and certainly will be created that are not included in this list, as many process modules such as the Variable process module and Questionnaire process module can create arbitrary variables as decided by the modeller.
| Variable name | Variable description |
|---|---|
| api_client_status_code | The HTTP status code returned by API client. (API Client) |
| appointment_at | The appointment UTC date time. (Appointment) |
| appointment_date | The appointment local date. (Appointment) |
| appointment_time | The appointment local time. (Appointment) |
| code | A code entered by the customer. (Code) |
| code_in | A code that should be checked. (Code) |
| code_value | A variable value, that is set upon entering a correct code. (Code) |
| consent_terms | true if the customer has accepted terms. |
| coupon_code | Coupon code as received by the customer. (Coupon) |
| interacted | true if the customer has interacted with the process, i.e. has responded to the chat at least once. |
| live_in_force_start | If true, the live chat is forced to start, i.e. ignores if there are agents available. (Live, Sikom) |
| loyalty_points_received | When the customer receives loyalty points, the number of received points. Not identical to the final loyalty_balance. (Loyalty) |
| loyalty_points_spent | When the customer spends loyalty points, the number of points spent. Not identical to the final loyalty_balance. (Redemptions) |
| nps_detractor_text | The NPS detractor feedback text a customer has given. (NPS Survey) |
| nps_passive_text | The NPS passive feedback text a customer has given. (NPS Survey) |
| nps_promoter_text | The NPS promoter feedback text a customer has given. (NPS Survey) |
| nps_score | The NPS score a customer has given. Should be a value from 0 to 10. (NPS Survey) |
| nps_text | The NPS text a customer has given, either detractor, passive or promoter. (NPS Survey) |
| opening_hours_open | true if opening hours are open, else false. (Opening Hours) |
| participation | The timestamp of the last participation, when the customer has participated in a giveaway participation. (Participation) |
| participation_not_allowed | true if the customer was not allowed to participate in a giveaway participation, e.g. due to a prior participation. (Participation) |
| region | The region selected by the customer. (Region) |
| scanner_code | The code scanned by the customer. (Scanner) |
| sikom_agent_available | true if an agent is available in Sikom. (Sikom) |
| snapshot_image | The id for the image uploaded by the customer. (Snapshot) |
| snapshot_image_url | The URL for the image uploaded by the customer. (Snapshot) |
| talkevent_agent_available | true if an agent is available in Talkevent. (Talkevent) |
| win | true is the customer has won an instant win, else false. (Win) |